In this post I will share you how to install and use MongoDB in Windows in easy steps.
Step 1 : Download MongoDB
Go to MongoDB's official site and select the suitable version for your system and download.
Here is the link to download : https://www.mongodb.com/download-center?jmp=nav#community

Step 2 : Install it
To install MongoDB go to download location on your computer, double click the file and press Run when pop-up appears.
Step 3 : Add MongoDB to System Path Variable
Go to control panel then “Edit the system environment variables". when “System Properties” window appears, click on “Environment Variables…” and click on "New.." which appears in the bottom.
Give Variable name as "Path" and Variable value as "C:\Program Files\MongoDB\Server\3.4\bin" (navigate to MongoDB's bin folder to get the right path based on your system and folder location). Variable value depends on where you MongoDB script folder resides.

Step 4 : Run MongoDB server
Open a command prompt window and run the "mongod" command, this command run the "MongoDB" server at "27017" port and ready to connection with a client.

Step 5 : Run MongoDB client
Open another command prompt window and run the "mongo" command, this command create a client and establish the connection to server running at port "27017".

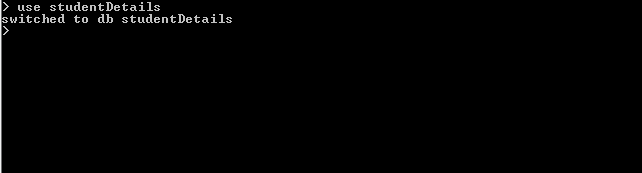
Step 6 : Create a new database
use studentDetails
Step 7 : Insert Data into database
db.students.insert([{"studentName":"Ankur","marks":"20"},
{"studentName":"Raj","marks":"30"}])

Step 7 : Check inserted Data into database
db.students.find().pretty();
 I think today you learnt enough about mongoDB, Now go and give a try.
Happy Learning :-)
Step 1 : Download MongoDB
Go to MongoDB's official site and select the suitable version for your system and download.
Here is the link to download : https://www.mongodb.com/download-center?jmp=nav#community
Step 2 : Install it
To install MongoDB go to download location on your computer, double click the file and press Run when pop-up appears.
Step 3 : Add MongoDB to System Path Variable
Go to control panel then “Edit the system environment variables". when “System Properties” window appears, click on “Environment Variables…” and click on "New.." which appears in the bottom.
Give Variable name as "Path" and Variable value as "C:\Program Files\MongoDB\Server\3.4\bin" (navigate to MongoDB's bin folder to get the right path based on your system and folder location). Variable value depends on where you MongoDB script folder resides.

Step 4 : Run MongoDB server
Open a command prompt window and run the "mongod" command, this command run the "MongoDB" server at "27017" port and ready to connection with a client.
Step 5 : Run MongoDB client
Open another command prompt window and run the "mongo" command, this command create a client and establish the connection to server running at port "27017".
Step 6 : Create a new database
use studentDetails
Step 7 : Insert Data into database
db.students.insert([{"studentName":"Ankur","marks":"20"},
{"studentName":"Raj","marks":"30"}])
Step 7 : Check inserted Data into database
db.students.find().pretty();
I think today you learnt enough about mongoDB, Now go and give a try.Happy Learning :-)


0 on: " Install and use MongoDB in Windows"